

Cubesat PoC
The Goal
The CubeSat Proof of Concept, or CubeSat PoC for short, was designed and produced as a school project in 2021. The goal was to develop a CubeSat that works, looks and feels like a real CubeSat, in order to further my knowledge of satellites and the related electronics and engineering. Unfortunately the CubeSat PoC does not yet work (due to the global chip shortage and time constraints), although I gained a huge amount of knowledge and skills, so the project was not a complete failure.

Aluminium Structure
A major part of the CubeSat PoC design criterial involved constructing an aluminium frame, similar to that of real CubeSats. This frame took a very long time to produce, with a lot of trial and error involved with the CNC machining process and some major issues with the bends. Overall, the aluminium frame is certainly far from perfect, however I learnt a lot and it looks great.


Solar Panels
The CubeSat is surrounded by circuit boards containing solar panels, to extend my knowledge of solar and charging batteries. During testing, the solar charging circuitry caught fire. Due to time constraints, the issue was never fixed. As a result, the solar is currently just giving the CubeSat an official look, they do not work.
EPS Board
The EPS board (Electrical Power System) stores, regulates and distributes the power throughout the CubeSat. This PCB is by far the most complicated required for the project, as there is a very large amount of components and all systems need to work perfectly together. This board also holds the switch for the CubeSat, which is a microswitch. When a pin is inserted into the CubeSat, it pushes the microswitch and the CubeSat turns off.


Processor Board
The processor board utilises an ATSAMD21 microcontroller. This is programmed though USB or SWD. This board acts as a CPU for the CubeSat, controlling every system and monitoring the CubeSats condition.
Sensor board
The sensor board was a real disaster, and is the main reason that I put the CubeSat project on hold. Due to the global electronic chip shortage, almost every sensor that I designed into the PCB was out of stock. The GPS, temperature sensor and inertial measurement unit were all unavailable by the time I tried to order the components.


Telemetry Board
The telemetry board is very basic. it was designed that way on purpose, to minimise chances of wireless communication failing. It consists of a HC-12 communication module, two amplifiers (one for each antenna) and some related capacitors.
Receiver Unit
The receiver unit is simply a combination of the processor and telemetry boards. A HC-12 is used to receive wireless signals, which an ATSAMD21 processes them and sends them to the USB port. The original design included a aluminium enclosure, though time restrains restricted that. Instead, it received a few coats of conformal coating to somewhat protect it.

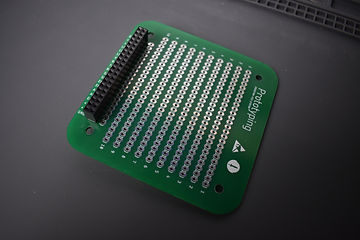
Prototyping Board
The prototyping board was a way of future proofing the CubeSat. In the event that sensors were unavailable or I wanted to add more to the CubeSat, I could simply buy a module and solder it onto this board. In the future, I will be buying sensor modules and soldering them to this board so that I can finally see the CubeSat working.
From day one I knew that the CubeSat would be a very complex bunch of systems, in a small space with tight tolerances. So every part of the CubeSat was modelled in CAD, before any parts were ordered. This was a great tool to get exact dimensions of the aluminium structure, and to ensure the CubeSat did not exceed 10x10x10cm.

CAD

Electronics Stack
All of the internal PCBs were mounted in a stack form, to replicated a real CubeSats design and make the most of the space. This stack is held together with standoffs and screws, and mounts onto the bottom aluminium plate. This makes integrating the electronics into the rest of the CubeSat structure extremely quick and easy.
Transport
In typical RAS style, the CubeSat is transported in a tough case. As the CubeSat was a school project, I had to transport the CubeSat to and from school many times. The front of this case says 'caution, sensitive space hardware', just to add a cool look. This was the start of some interesting conversations when I was walking into school...
